WordPress(ワードプレス)でPhotoSwipe v5を利用する方法
Contents
WordPress(ワードプレス)でPhotoSwipe v5を利用する方法
前回「PhotoSwipe v5でギャラリーを作る方法」で紹介したPhotoSwipe v5をWordPressで利用する方法を紹介します。
サンプル
画像


ギャラリー




投稿に導入する方法
投稿ごとに導入する場合には「カスタムHTML」を利用してください

まず、PhotoSwipe v5 のCSSファイルを読み込んでください。
PhotoSwipe v5の導入方法は以下の記事を参照してください。
CSSファイルインクルード
<link rel="stylesheet" href="/assets/PhotoSwipe5/dist/photoswipe.css">
<link rel="stylesheet" href="https://unpkg.com/photoswipe-dynamic-caption-plugin/photoswipe-dynamic-caption-plugin.css">今回はプラグインを利用し、キャプションも表示させるため『photoswipe-dynamic-caption-plugin.css』も読み込みます。
Javascriptコード追加
PhotoSwipe v5用にアンカーおよび属性設定
まず、PhotoSwipe v5 を初期化する前に、PhotoSwipe v5用にイメージタグをアンカータグでラッピングし、関連属性を設定します。
この処理の仕様は以下の通りです。
- ページロードしてから処理が始まります
- Figureタグの直下にあるImgオブジェクトを対象とする
- Imgオブジェクトをアンカータグ(<a>)でラップし、PhotoSwipe用の属性を設定する
- 高さと幅はJavascriptのnaturalHeightとnaturalWidthで設定する、設定のタイミングは画像読み込み終了後
- あわせて、Figureタグと紐づく、figcaptionをキャプション文字列とする
- ギャラリーを想定し、Figcaptionに文字列が設定されていない場合には、Figureタグ上位のFigureタグを検索し、それに紐づくFigcaptionをキャプション文字列とする
- 属性設定後、PhotoSwipe初期化のJSファイルを読み込む。
- なお、PhotoSwipeの代替テキストは日本語にしている
<script type="text/javascript">
function setPhotoSwipe5Attr() {
   var elements = document.querySelectorAll("figure img");
   var len = elements.length;
   for (var i=0; i <len; i++ ) {
      var elm = elements[i];
      /* アンカー設定 */
      setAnchor(elm);
   }
   /* PhotoSwipe初期化用モジュール読み込み */
   loadInitializeFile();;
}
function setAnchor(elm) {
   var anchor = document.createElement("A");
   var fig = elm.parentElement;
   var caption = "";
   var imgSrc = elm.getAttribute('src');

   /* キャプション取得 */
    figCap = getCaption(fig);
   if ( figCap != undefined ) {
      caption = figCap.textContent;
   }
   if ( caption == "" ) {
      var parelentEem = fig.parentElement;
      for ( var i=0; i < 3; i++ ) {
         if ( parelentEem == undefined ) break;
         var tagName = parelentEem.tagName;
         if ( tagName != undefined ) {
            if ( tagName.toUpperCase() == "FIGURE" ) {
               /* ギャラリーの場合のキャプションを再取得を試みる */
               var subFigcap = getCaption(parelentEem);
               if ( subFigcap != undefined ) caption = subFigcap.textContent;
               break;
            }
         }
         parelentEem = parelentEem.parentElement;
      }
   }
   /* 高さ・幅を設定 */
   setHeightWidth(anchor,elm);
   /* キャプション領域生成 */
   var divCaption = document.createElement("div");
   divCaption.className = "pswp-caption-content";
   divCaption.innerHTML = caption;

   /* URL設定*/
   anchor.setAttribute('href',imgSrc);

   /* PhotoSwipe対象へ */
   anchor.setAttribute('data-photoswipe','gallery');
   /* アンカーにイメージを設定 */
   anchor.appendChild(elm);
   /* キャプションを設定 */
   anchor.appendChild(divCaption);
   /* Figureにアンカーを再設定 */
   if ( figCap == undefined ) {
      fig.appendChild(anchor);
   } else {
      fig.insertBefore(anchor,figCap);
   }
}
function setHeightWidth(anchor,img) {
   var imgSrc = img.getAttribute('src');
   var image = new Image();
   image.src = imgSrc;
   image.onload = function () {
      /* 画像の読み込みを待ってからサイズを取得 */
      var height = image.naturalHeight;
      var width = image.naturalWidth;
      if ( height > 0 && width > 0 ) {
         /* 高さ設定 */
         anchor.setAttribute('data-pswp-height',height );
         /* 幅設定 */
         anchor.setAttribute('data-pswp-width',width );
      }
   }
}
function getCaption(fig) {
   var figCap = null;
   /* キャプション取得 */
   if (fig.hasChildNodes()) {
      var children = fig.childNodes;
      for (var i = 0; i < children.length; i++) {
         var child = children[i];
         var tagName = child.tagName
         if ( tagName != undefined ) {
            if ( tagName.toUpperCase() == "FIGCAPTION" ) {
               /* キャプションの場合 */
               figCap = child
               break;
            }
         }
      }
   }
   return figCap;
}

function loadInitializeFile() {
   /* PhotoSwipe初期化用モジュール読み込み */
   var d = document;
   var script = d.createElement('script');
   script.src = '/js/InitializePhotoSwipe5.js';
   script.type = 'module';
   var h = d.getElementsByTagName('head')[0];
   h.appendChild(script);
}
window.addEventListener('load', function() {
   setPhotoSwipe5Attr();
})
</script>
JSファイルにしました
上のJavascriptコードが少し長いので、それと同じJSファイルを以下に用意してみましたのでそれを読み込んでもいいと思います。
<script type="text/javascript" src="https://www.single-life.tokyo/js/PhotoSwipe5ForWordpress.js"></script>PhotoSwipe v5初期化
次にPhotoSwipe v5を初期化するコードを書いて、対象のオブジェクトを事前に設定したアンカー(<a>)の属性「data-photoswipe」の値が『gallery』になっているものとします。
ただし、事前にPhotoSwipe用の属性を設定しているスクリプトにてこの処理をしているJSファイルを読み込んでいるので、これをJSファイルにしてください。
   <script type="module">
      import PhotoSwipeLightbox from '/assets/PhotoSwipe5/dist/photoswipe-lightbox.esm.js';
      // or 'photoswipe-dynamic-caption-plugin' if using package manager
      import PhotoSwipeDynamicCaption from 'https://unpkg.com/photoswipe-dynamic-caption-plugin/photoswipe-dynamic-caption-plugin.esm.js';

      const lightbox = new PhotoSwipeLightbox({
        gallerySelector: 'body',
        childSelector: "a[data-photoswipe='gallery']",
        closeTitle: '閉じる',
        zoomTitle: 'ズーム',
        arrowPrevTitle: '前へ',
        arrowNextTitle: '次へ',
        pswpModule: () => import('/assets/PhotoSwipe5/dist/photoswipe.esm.js'),
        // Optional padding for images,
        // note that this is an option of PhotoSwipe, not a plugin
        paddingFn: (viewportSize) => {
          return {
            top: 30, bottom: 30, left: 70, right: 70
          }
        },
      });
      const captionPlugin = new PhotoSwipeDynamicCaption(lightbox, {
        // Plugins options, for example:
        type: 'below',
      });
      // make sure you init photoswipe core after plugins are added
      lightbox.init();
   </script>
JSファイルにしました
この処理はJSファイル前提なので、JSファイルにしてあります。
<script type="module" src="https://www.single-life.tokyo/js/InitializePhotoSwipe5.js"> </script>すべてのソースを読み込むには?
最後に、上記ソースを読み込むと以下のようなコードを「カスタムHTML」で追加してください。

サイト全体に導入方法
ウィジェットに追加
ウェジェットにフッター項目があるようでしたら、そこにカスタムHTMLで上記Javascriptを追加してください。
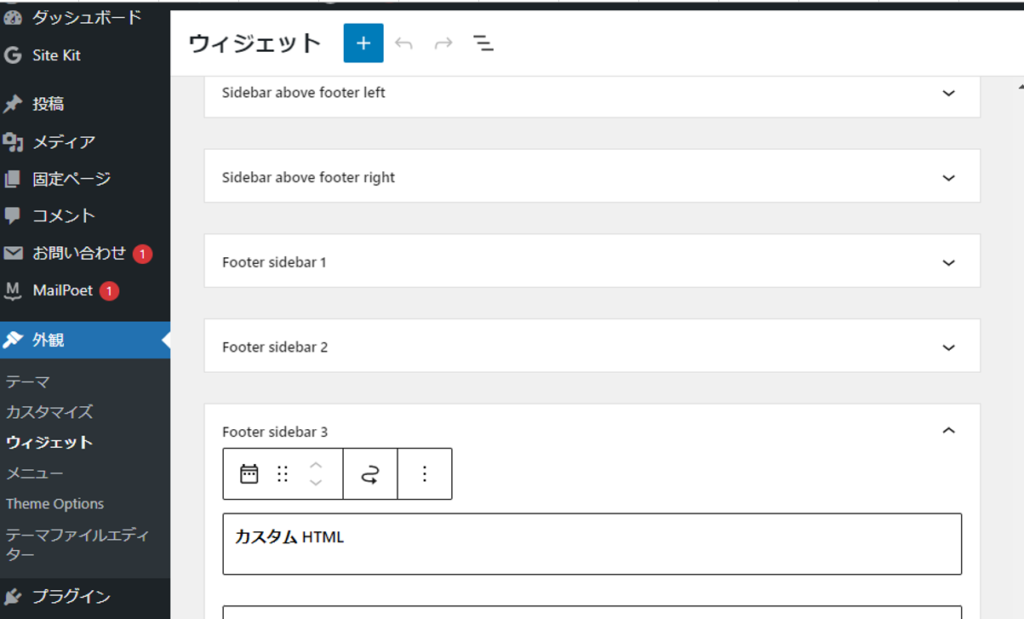

コードを追加し、保存してください
テーマを直接編集
「テーマファイルエディタ」から選択しているテーマのソースを直接編集することができます。
そこで「footer.php」を直接編集できますので、そこのscriptタグを追加してください。
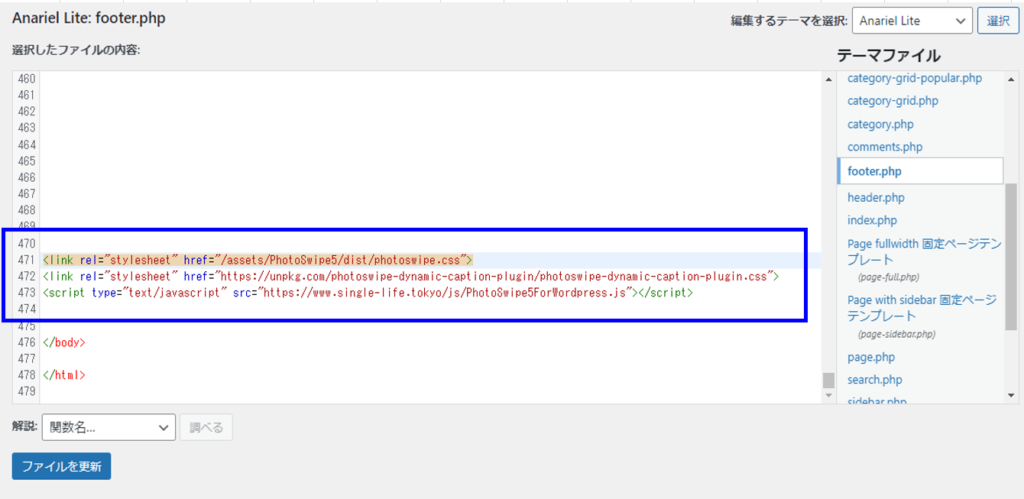
ご参考
関連ページ
- WordPress(ワードプレス)でFancybox v4を利用する方法
- PhotoSwipeでギャラリーを作る方法
- Fancybox v4でギャラリーを作る方法
- Lightcaseでギャラリーを作る方法
- Colorboxでギャラリーを作る方法
- LIGHTBOXでギャラリーを作る方法


でPhotoSwipe-v5を利用する方法-1500x720.png)


でFancybox-v5を利用する方法-345x230.png)
-255x170.png)
-255x170.png)
-255x170.png)
-255x170.jpg)
